
So you want to learn audio production basics? It’s one part creative thinking and one part tech wizardry.
To fully master the art you need to be able to balance both. It means always learning new techniques and experimenting with new ideas and sounds. From editing and mixing, recording to mastering and then remixing! There is so much to learn and it really is a never ending quest to find that ‘sweet spot’.
Whether you want work in music, film, podcasts, radio, sound effects, whatevs! There are some many tips, tricks and techniques to explore down the track. But first up, put on your learning pants and get to know the basics.
Table of Contents
Learn Audio Production Basics

The Magic of Reverb
Reverb is more than just an echo. It’s the art of putting something into a space. Like a voice in the shower, or a car in the distance, or a fart bubbling up from below in the bathtub.
And there are so many creative ways you can use reverb. Ever thought of whacking it on just the high frequencies of a snare?
Or maybe on just the tails of a guitar pluck? By manipulating the wet and dry signals, you can create illusions of space, from the claustrophobic confines of a shoebox to the echoing vastness of the Grand Canyon. And for those who dare to tread where few have ventured, dive into the world of gated reverb. The 80s rang and said, “Phil Collins wants his drum sound back!“
If you’re making something random and funny, reverb can be a tool of exaggeration. One way it’s used is for comedic effect, where a trivial statement, when paired with heavy reverb, is made to sound profound or overly dramatic, creating a humorous contrast. Another common comedic effect is a dreamy reverb letting the listener know what they’re seeing isn’t real.
Off-screen voices also offer comedic potential. Imagine a character thinking they’re hearing the voice of a higher power or their own conscience. An ethereal reverb can make this comedic, especially if the “higher power” is giving them ridiculous advice.
On the other hand, in drama productions, reverb is often used more subtly to enhance the emotional and atmospheric depth of a scene. It can emulate the acoustics of particular environments, such as cathedrals, large halls, or small rooms, helping to immerse the audience in the setting.
When characters express internal thoughts or monologues, a slight reverb on their voice can distinguish these moments from regular spoken dialogue, giving them a more introspective quality.
In intense emotional scenes, a touch of reverb can amplify the resonance of dialogue, making the emotions feel rawer and more palpable. Off-screen voices in dramas, enhanced with reverb, can indicate someone calling from a distance, a memory of a past conversation, or even a supernatural presence.
Additionally, reverb can be a tool to smooth transitions between scenes, especially if the subsequent scene is set in a different time or place.
Backward is the New Forward
Reversing sounds is a cool trick. Reversed pianos can create an air of suspense, making the audience lean in, anticipating the next note. Backward drums can add an unexpected twist to a beat, giving it a fresh and innovative feel.
And yes, the reversed cymbal? It’s the oldest trick in the book, but it’s like salt – sprinkle it everywhere, and watch the magic happen.
Here are some potential ideas to experiment with when reversing sounds:
Ambient Pads: Reverse long chords or drones to create evolving soundscapes that can set the mood for a scene.
Guitar Riffs: A reversed guitar riff can sound haunting and otherworldly, perfect for creating tension.
Vocal Phrases: Reversing phrases or words in a song can add mystery, especially if layered with the original.
Percussive Elements: Reversed shakers, tambourines, or even handclaps can introduce unique rhythmic patterns.
Sound Effects: Nature sounds, like water or wind, when reversed, can create an eerie backdrop.
Synth Leads: Reversing synth sounds can lead to unexpected melodic developments for electronic tracks.
Basslines: A reversed bass can provide a groovy and unpredictable foundation for a track.
The beauty of reversing sounds lies in its unpredictability. It’s an invitation to you to think outside the box.

Layering: The Sound Sandwich
Layering is the art of stacking sounds on top of each other; understanding the nuances of each element and how they can complement and enhance one another. For sound designers and producers aiming for impact laying is the secret sauce.
Imagine layering like a sandwich. Your base sound is the bread. This could be a deep kick drum, providing the thud that resonates in the chest. But a kick drum alone, no matter how powerful, can sometimes lack character. This is where the magic of layering comes into play.
Add some textures. Perhaps layer the kick with the sound of a slamming door or a basketball bounce. These unconventional sounds can add a unique timbre, making the beat stand out. Sprinkle in some high-frequency sparkles, like the sizzle of a hi-hat, to give clarity and contrast to the heavy base.
But why limit yourself to traditional instruments? Dive into the world of genre fusion. Imagine the elegance of a classical violin layered over the raw power of a heavy metal guitar riff. The juxtaposition can create a sound that’s both melodic and aggressive, perfect for genres like trap metal or orchestral hybrid tracks.
Here are some examples to inspire your layering journey:
Urban Meets Classical: Blend the 808 bass, synonymous with hip-hop, with orchestral elements like cellos or brass. The result? A beat that’s both grandiose and street-ready.
Electronic Fusion: Combine synthesized arpeggios with live-recorded instruments, like a saxophone or electric guitar, for a beat that bridges the gap between the digital and the organic.
Worldly Beats: Integrate instruments from different cultures. Think of a tabla (Indian percussion) layered with an electronic snare or a didgeridoo (Australian wind instrument) providing a drone under a trap beat.
Temporal Blend: Mix vintage sounds, like vinyl crackles or old radio broadcasts, with modern synths and drums. It’s a sonic journey through time, making beats feel both nostalgic and fresh.
Layering is all about experimentation. It’s about breaking boundaries, challenging conventions, and most importantly, trusting your ears. As you layer, tweak, and refine, you’ll find that the possibilities are truly endless.
And when done right, the results can be nothing short of breathtaking, ensuring your beats not only hit hard but also leave a lasting impression.
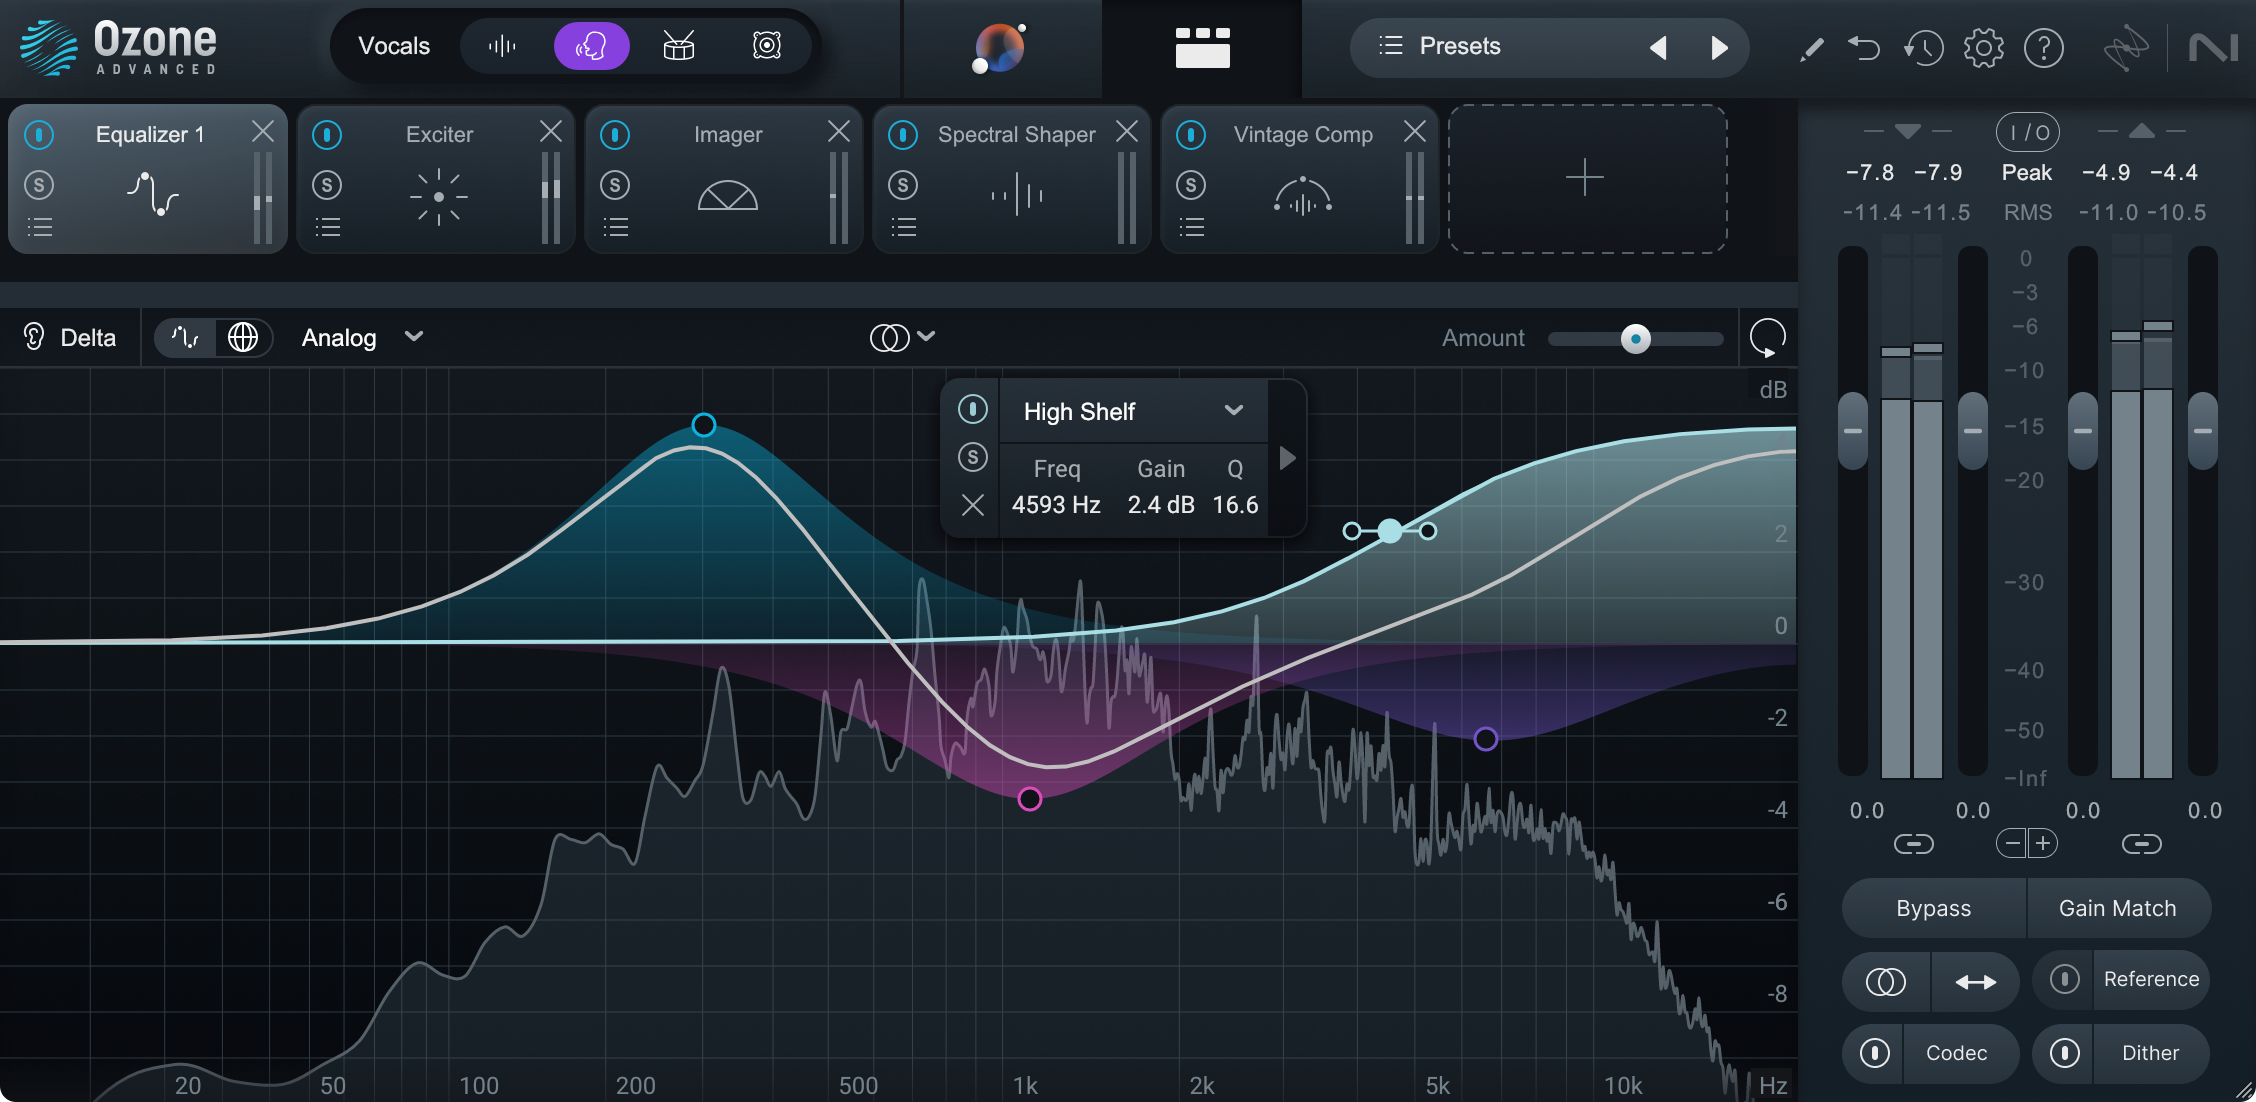
Crafting Effects with EQ:

EQ is your best friend for easily creating effects.
To make someone sound like they’re on the telephone, cut out the low frequencies (below 300Hz) and the high frequencies (above 3.4kHz). This leaves you with the mid-range frequencies of old telephone lines.
To achieve the sound of an old AM radio broadcast, roll off the low frequencies below 500Hz and the high frequencies above 2kHz. Boosting the midrange slightly can also enhance the effect. Then add some fuzz!
For the sound of a voice coming through a megaphone or a public address system, cut the lows below 400Hz and the highs above 3kHz. A slight boost around 2kHz can add to the tinny, distant characteristic of such systems.
Put someone underwater, by rolling off the high frequencies sharply after 500Hz. This leaves primarily the low frequencies, which travel better underwater. Then get them to talk while flicking their finger over their li-i-i-i-i-i-i-ps.
A gentle boost around 10kHz to 15kHz can add a sense of airiness and clarity to vocals, making them stand out in a mix.
If an instrument or vocal sounds too harsh, a cut in the 2kHz to 4kHz range can help soften it.
To make a sound seem distant, reduce the high frequencies, simulating the natural loss of high frequencies over distance.
Using EQ to boost or cut different frequencies on the left and right channels can create a sense of enhanced stereo width.
Then there’s the old “sweep and destroy” method. Boost a narrow frequency band and sweep it across the spectrum until you find the problematic frequency that’s causing issues (like feedback or resonance). Once identified, cut that frequency.
Automating EQ changes over time can create a sense of movement. For instance, automating a high-pass filter to move up and down can simulate the sound of an object moving closer and then farther away.
Just a few things to muck around with.
Compression
Compression isn’t just about controlling dynamics; it’s about shaping the character and emotion of a sound. It can be the difference between a flat, lifeless track and a vibrant masterpiece. Here’s how professionals wield this powerful tool:
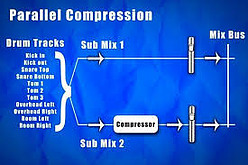
Parallel Compression: Often referred to as “New York Compression,” this technique involves blending an uncompressed signal with a heavily compressed version of the same signal. The result? Drums that punch through the mix with both clarity and weight, vocals that shimmer with presence without losing their natural dynamics, and guitars that roar with power.
Multiband Compression: Think of this as EQ and compression’s love child. Instead of compressing the entire frequency spectrum uniformly, multiband compression allows you to compress different frequency bands independently. This means you can tighten up the bass, add punch to the mids, and let the highs breathe, all at the same time.
Sidechain Compression: Ever wondered how electronic music producers achieve that pulsating, rhythmic effect where the bass “ducks” under the kick drum? That’s sidechain compression at work. By compressing the bass every time the kick hits, it creates a rhythmic pumping effect that can make a track feel alive.
Vintage Vibe with Analog Compression: Analog compressors, like the LA-2A or the 1176, are renowned for their unique sonic characteristics. They don’t just control dynamics; they add warmth, saturation, and a touch of vintage magic. Using analog-style compression plugins can infuse your tracks with that sought-after vintage character.
De-essing: A specialized form of compression, de-essers are designed to tame harsh sibilant sounds in vocals (like “s” or “sh”). By compressing only when these sharp sounds occur, de-essers ensure vocals are smooth ear.
RMS vs. Peak Compression: While peak compressors react to short, transient peaks in the audio, RMS (Root Mean Square) compressors respond to the average level. This means RMS compression can provide a smoother, more musical compression, ideal for vocals or pads.
Limiting: The final frontier of compression. Limiters are compressors with a very high ratio, ensuring that the audio does not exceed a certain level. They’re the last line of defense in mastering, making tracks loud and punchy without clipping.
Want to Learn More?
Yeah! You do.
Here are some great places to get started.
Sound Editing and Mixing: Dive deep into software tools like Adobe Audition, Pro Tools, and Audacity to edit, mix, and manipulate audio files. Offered by Coursera.
Deadmau5 Teaches Electronic Music Production: Learn the revolutionary, industry-leading methods and techniques used by the award-winning music producer, deadmau5. Offered by MasterClass.
Timbaland – Teaches Producing and Beatmaking: Get insights from the legendary Timbaland on producing and beatmaking. Offered by MasterClass.
Ableton Live I: The First Steps of Digital Music Production: A beginner’s guide to using Ableton Live for music production. Offered on Skillshare.
Audio Mixing Master Class: Enhance your mixing skills with this comprehensive course. Available on LinkedIn Learning.
Music Production: Techniques and Concepts: A course that covers the foundational techniques in music production. Available on LinkedIn Learning.
Music Production Secrets: Unlock the secrets of professional music production. Offered on LinkedIn Learning.
Music Production in Logic Pro X – The Complete Course!: All-encompassing course. Available on Udemy.
Producing Electronic Music with Logic Pro: Electronic music production using Logic Pro. Offered on CreativeLive.
Music + Audio Production in Logic Pro X – The Complete Guide: A comprehensive guide to music and audio production in Logic Pro X. Available on Udemy.
FL Studio 20 – Music Production In FL Studio for Mac & PC: Master FL Studio 20 with this course. Offered on Udemy.
Any questions, please reach out in the comments below! 🤘

Great article! I found your insights into reverb, reversing sounds, layering, EQ, and compression techniques to be incredibly helpful and inspiring. Audio production can be quite intimidating, but your explanations make it feel more approachable and fun to experiment with.
I’d love to hear more about your personal experiences with these techniques. Do you have any favorite or memorable moments where using reverb, reversed sounds, or unique layering really transformed a track?
Also, could you recommend some specific software or plugins for these various effects and techniques that are beginner-friendly and budget-conscious?
Hey Leila! Glad to hear you got something out of this. Once you get into it, there are loads of tricks you can use to create different sounds in your mix. Reversing stuff and add reverbs is a great starting point if you’re a beginner. As for specific plug ins, once you choose a DAW you’ll find you get a lot of basic plug ins included in the software. Then later on you can choose to upgrade to more complex options if you like. Thanks, Mike.