So you can’t play an instrument, but want to make music?
It is possible, thanks to the magic of computers, virtual instruments and making music with MIDI. All you need ear for music and melody and a little understanding of how harmony works.
If you’re anything like me, it will just involve a lot of searching for chord progressions and drum patterns. But if you’re up for learning something new and crave making a song of your own, then let’s get into it.
Table of Contents
Getting Started
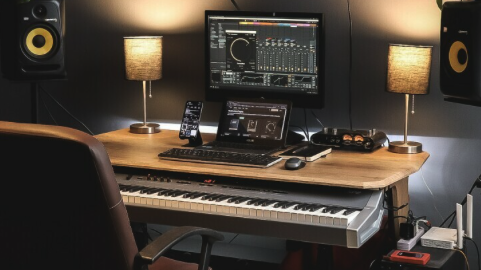
The first thing you’ll need is a MIDI controller or keyboard. But don’t be scared if you can’t play a note. Thanks to the magic of editing, you will be able to fix your mistakes, draw in notes and edit later.
Then, you’ll need a DAW (Digital Audio Workstation).
This is the software you’ll need for recording, editing, and producing your music. Depending on your budget, there are loads of options, like Ableton Live, FL Studio, Logic Pro (for Mac users), Pro Tools, and GarageBand (a free option for Mac users).
Find the program that works for you and your budget, but basically any of them will be good if you’re just getting started – they all do the same thing essentially.
Next, spend some time learning the DAW. Watch tutorials, and just do lots of experimenting to get your head around the software and understand its basic functions. Simple things you’ll need straight up are how to create tracks and add virtual instruments.
>>> Check this out – Record MIDI using your voice – no Musical Talent Needed <<<
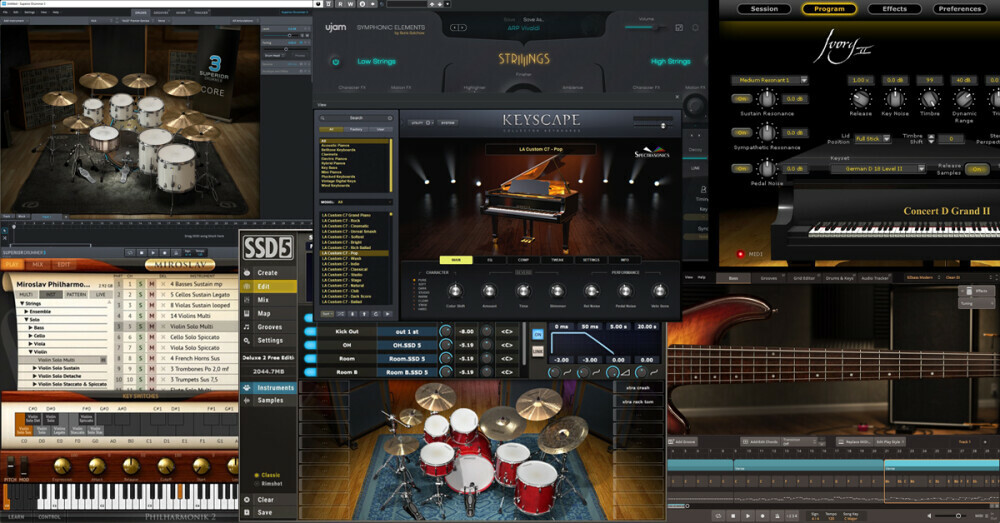
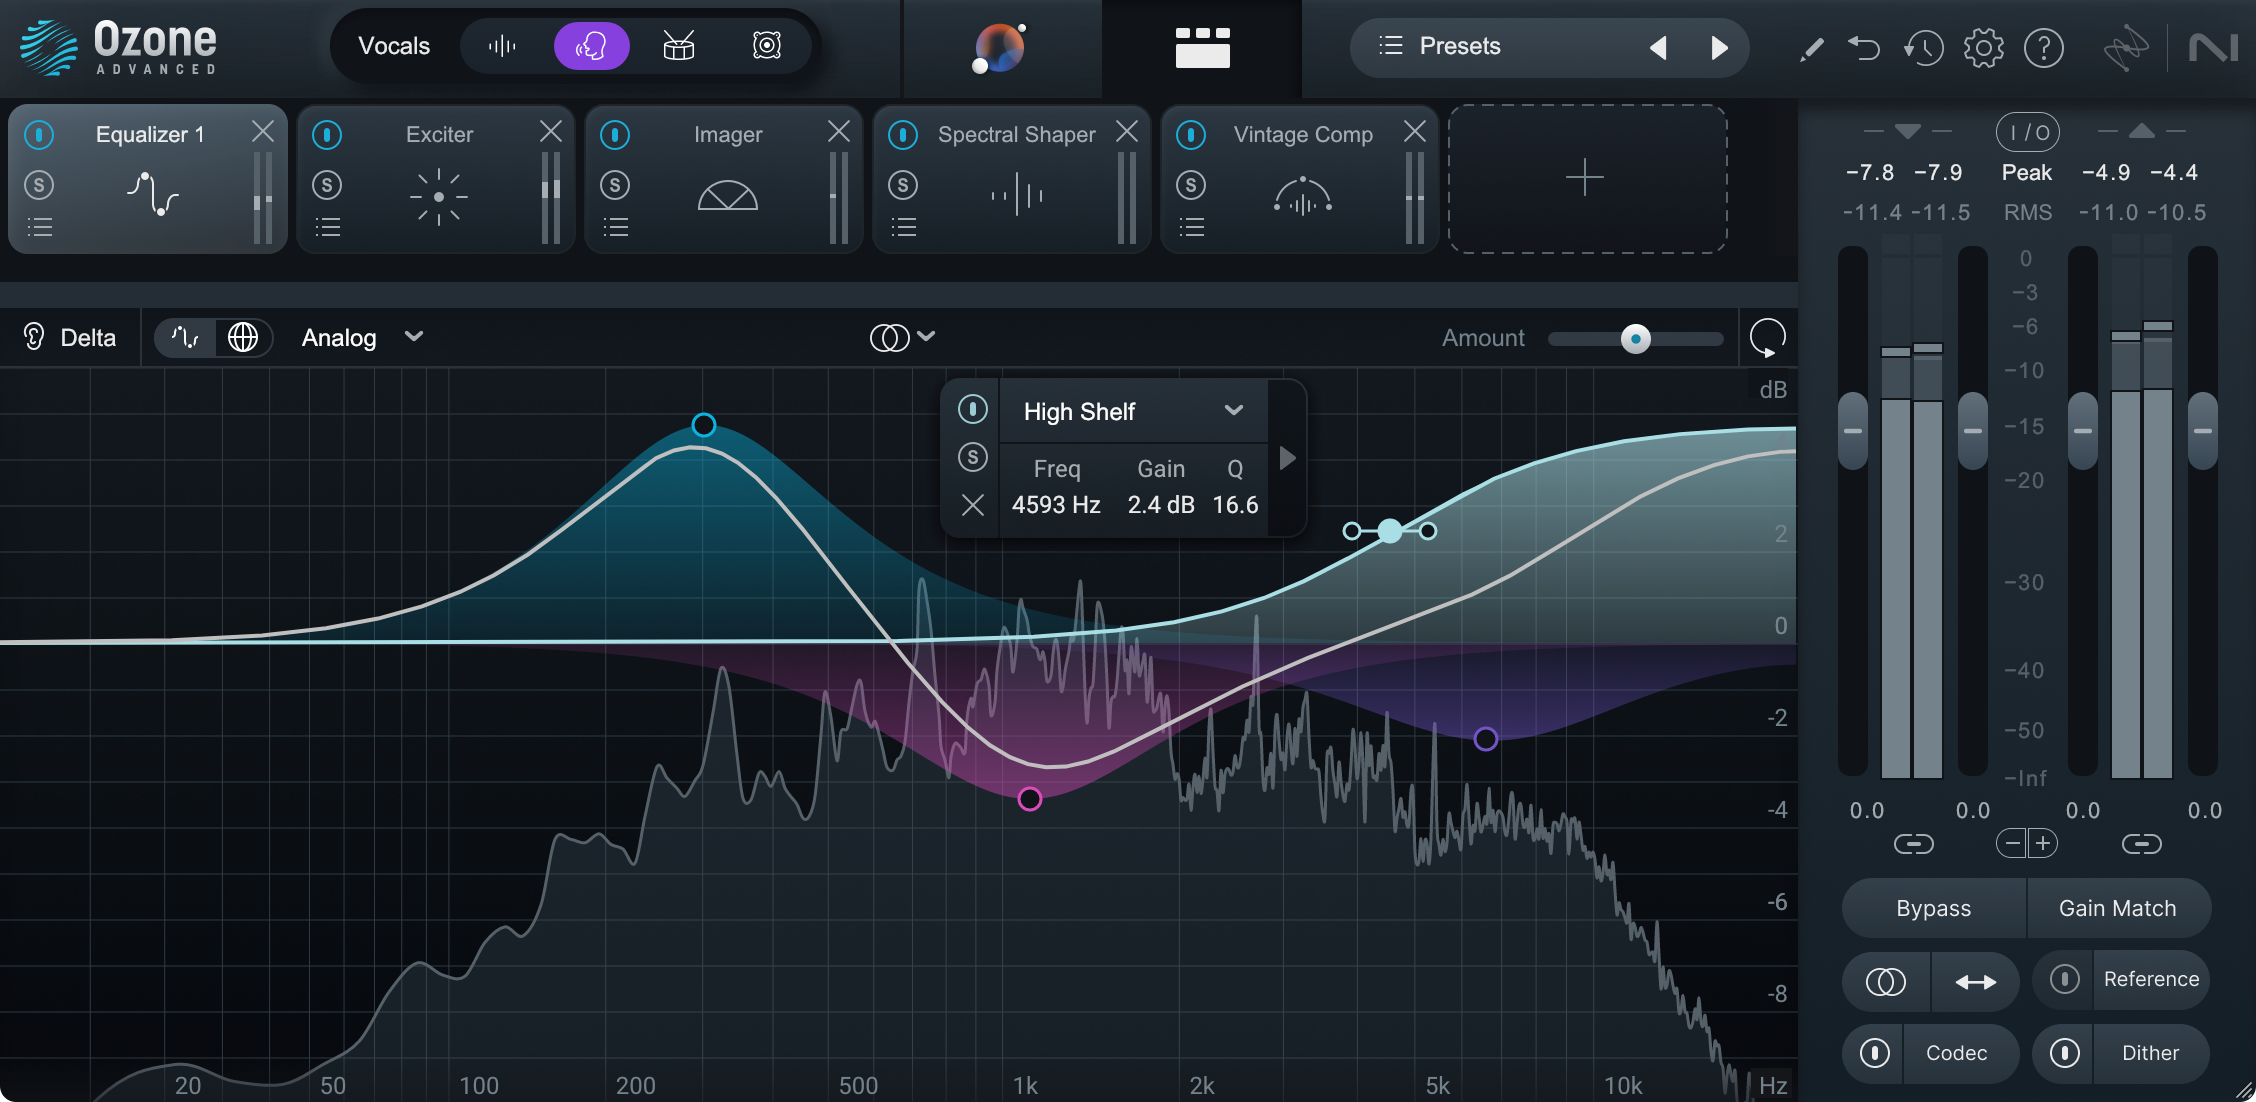
Virtual Instruments
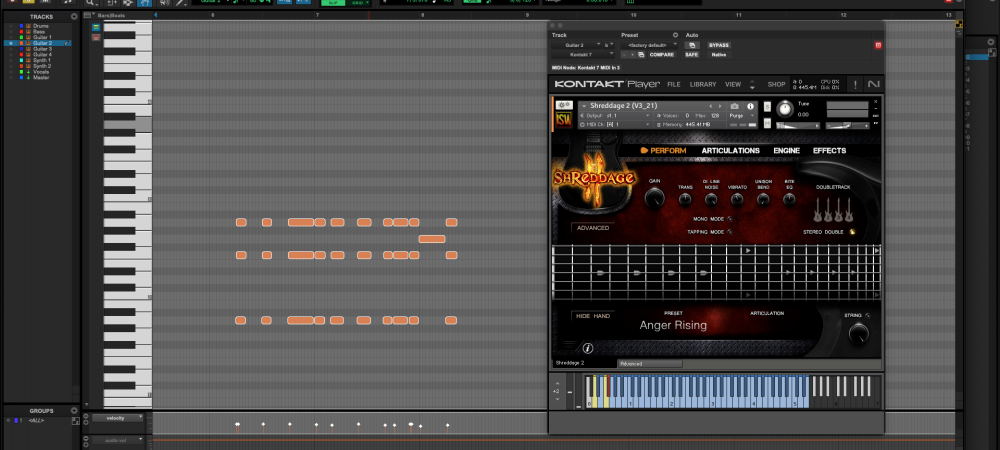
A Virtual instrument is just a digital plugin version of a real instrument. This is how you’re gonna make music without any real instrument. Most DAWs come with a range of built-in virtual instruments and sound libraries.
Your DAW will most likely come with a whole library of loops. Drum loops, bass loops, guitar loops. This is great way to get started without any musical knowledge. Just drag and drop some loops you like into a session to get started. Create something basic using just these loops, but you’ll quickly want to start adding some melody. And that’s where MIDI comes in.
MIDI stands for Musical Instrument Digital Interface.
It’s how electronic musical instruments, computers, and other devices connect and talk to each other. MIDI files hold all the notes, pitch and velocity (how hard you hit the keys), as well as control signals for things like volume, vibrato, panning, cues, and clock signals to set the tempo.
The MIDI files themselves have no audio, but send information about how music. Basically, hit a G chord and you see a G on the screen, then the more you play you can see all the musical notes on screen as a MIDI file.
>>> Click here for help setting up your home recording studio <<<
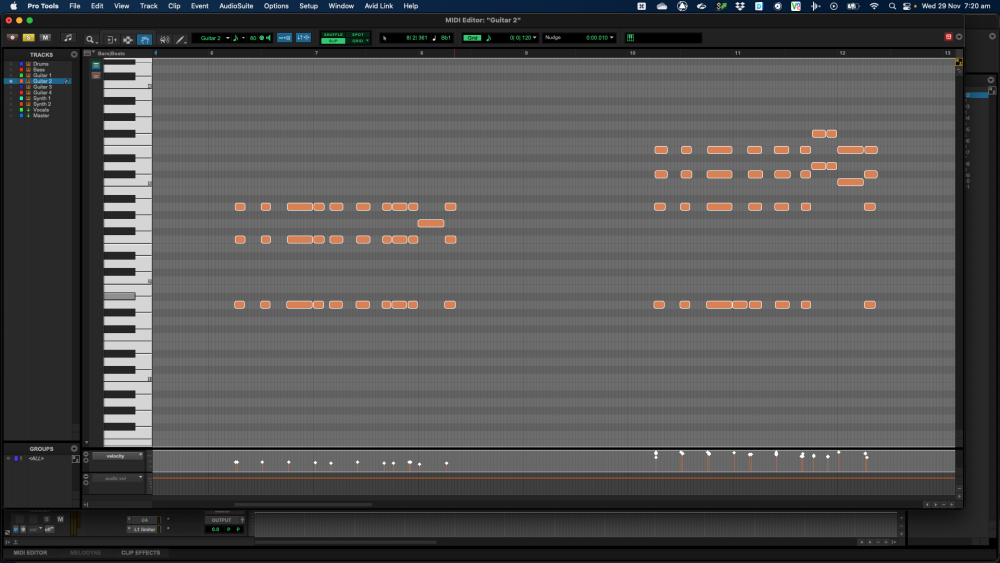
Recording MIDI
Record MIDI into your computer using your MIDI Keyboard. Or you could even experiment with Dubler 2, a cool MIDI controller that uses your voice to input the MIDI notes, so you don’t even have to play anything. These things are all easily connected to your computer with USB.
A MIDI keyboard works just like a piano . The difference with this piano is that it also plays trumpet, guitar, even drums – each drum sound is mapped across the keyboard. Once you set up a virtual instrument and start tapping away on the keys you’ll get it really quickly.
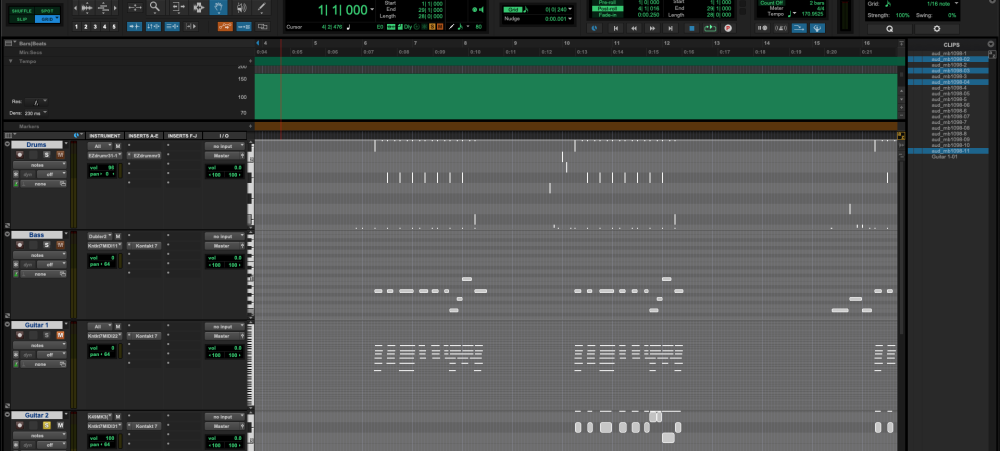
Once you have your MIDI Controller connected and set up correctly within your DAW, start a new project, add some tracks and then assign virtual instrument plugins to each track. If you’re making a rock song, a good start might be a simple guitar, bass, drums set up.
Search you library and find a guitar sound you want to use, same with drums and bass. If you’re not happy, this is where investing in some more virtual instruments comes in. There are endless options online for each instrument, and most are really realistic these days. Lots of options.
Start Simple: Begin playing notes (one finger at a time if you need to – all good) and you’ll see the MIDI notes appearing. Practice creating melodies, chord progressions, and rhythms.
Practice Timing and Rhythm: Work on your timing by playing along with a drum loop or even another song you like. You might be all over the place and out of time at first, but that’s ok, because you can fix that up later – Quantisation (I’ll discuss later) will be your new best friend.
Experiment with Melodies: Once you’ve mastered single notes, experiment with simple melodies. Trust your ears and play notes that sound good together. It doesn’t need to be complex.
Learn Basic Chords: Start exploring basic chords, like major and minor triads. Chord charts available online can be very helpful. Chords will add harmony to your melodies.
One-Finger Chord Method: If playing full chords is difficult, you can play chords one note at a time and then move these around in your DAW to create a chord.
Develop Chord Progressions: Experiment with different sequences of chords to find progressions. Listen to your favourite songs and rip them off to get started.
Build Rhythms: Try creating drum patterns and rhythms. It’s basically just like play drums on the dashboard of your car while driving. Start with basic beats and get more complex later.
Record and Edit: Record your performances and edit the MIDI data afterward. You can adjust notes, their lengths, and experiment with velocities to express dynamics.
Layer and Arrange: Layer different melodies, chords, and rhythms until you’ve got a whole song.
Having fun yet? Next up, is where you can get really creative.
>>> M-Audio Keystation 49 MK3 Unboxed: Comprehensive Review and User Experience <<<
Editing and Arranging
After you’ve got the hang of recording MIDI, it’s time to start editing, fine tuning and arranging everything into something that resembles a complete song. It might mean simple fixes on bung notes, or moving drums back in time or it could be moving complete verses or choruses around to completely rearrange the structure of everything you’ve recorded.
Editing MIDI Data: Your first step is usually editing the MIDI notes you’ve recorded. Fix any timing issues, adjust how hard each note is played (velocity), and change the length of the notes.
Experiment with Quantisation: Quantisation is how you keep everything on beat and in time by locking your MIDI notes to a specific time grid. But remember, it’s usually good to keep a bit of human touch so don’t go overboard and make everything exactly perfect.
Layering and Sound Design: Play around with different virtual instruments and sounds. Layering various instruments adds depth and texture. You can also get creative with sound design, like tweaking synthesiser parameters or trying out different sound presets.
Use MIDI Controllers: If you have knobs, sliders, or modulation wheels, use these to add life to the already recorded MIDI notes, adjusting aspects of your sound in real-time. You can adjust filters, effects, volume, and more, adding a dynamic touch to your music.
Create Variations and Develop Arrangement: Think about how to develop your track. Create different sections, like a verse, chorus, or bridge. Duplicate your MIDI clips and modify them to create variations and keep things interesting.
Mixing: Once your arrangement is sounding good, start mixing. Balancing levels, so each instrument sits nicely in mix, using EQ, compression, and reverb etc to get a polished sound.
>>> Get Started in Audio Production – click here <<<
in a Nutshell …
As you stand there scratching your head thinking this is all too much and you’ll never understand it, don’t over think it… just dive in and give it a crack. Remember, every great composer, producer, and artist started exactly where you are now.
You know how it all works, you know what gear to buy, you’re ready to start learning MIDI, recording stuff, and creating, editing, and arranging music. Each note you record, and rhythm you experiment with, is a stepping stone to making something really cool.
Embrace the occasional off-beat note or unexpected sound – they’re not mistakes, just part of the learning process. Let your imagination run wild, and you never know what will happen.